So I got an Absolute IMU-ACG sensor made by https://www.mindsensors.com/. And it was a lemon to boot. My luck was, I bought it via Generation Robots. They made a short deal out of it and I got a replacement sensor a couple of days later. That’s some service!
After that it was just a matter of time that I would start looking into that broken sensor…
Before I as much as begin ranting on this unit, I have to give you a word of advice: If you are in Europe, or anywhere where Generation Robots ships to, DO buy through them. The level of customer support is tremendous. I don’t get a kick-back from them, I’m just a satisfied customer.
But you didn’t come here to read on how good Generation Robots a dealer are, you sure want to learn more on the sensor – or why else would you google it up?
What is this sensor worth?
Well… not THAT much. Not by today’s standards. Mindsensors released it around 2010-2012, and that’s an epoch in the world of MEMS sensors. It’s kinda noisy and not very well compensated, slow, and since gyro and accelerometer are on separate chips, the axes are somewhat misaligned between gyro and accelerometer. So if you come from the world where today’s drones’ 32kHz 16 bit temperature compensated 6DOF IMUs are rock stable at $10 price point, you’ll find it a bit of an uphill battle.
Still, this sensor comes with a Mindstorms EV3 cable attached and there are EV3 program blocks (or python libraries) available to interface it, so you are better off than trying to connect something more modern and having to code everything from scratch. That a BIG plus, especially if it’s students that need to work with it and not a tinkering aficionado.
None the less, the unit does NOT have an on-board Kalman filter (or anything to that effect) so all you get are magnetic heading and turn rates for all 3 axes – but unfortunately NOT the integrated attitude info or any sort of 3D navigational data. Remember the LEGO own sensor? That one has a mode where it returns the total degrees of turn, for this one here you will have to code it yourself, which may be a bit of a challenge, since no software on EV3 is even close to running realtime (i.e. on fixed task timing). YMMV, I didn’t get very far just yet.
Calibration
Now, this is the thing you wanted to hear all along, isn’t it? The sensors claim to be factory calibrated and even if they are (my second unit was) the factory calibration is sort of okay-ish. The axes are not necessarily calibrated symmetrically and not even entirely accurately (within 2-5% of 1g at vertical I’d say).
My first sensor was actually providing some very funny data on all channels except for compass. The compass was doing more or less right. The worst was the accelerometer, claiming it sees +7g by just sitting on the table, but only on the Z-axis. X-axis, if turned towards Earth, would register only 0.8g. And the gyro seemed somewhat ‘sticky’. Whatever, this all looked like a MEMS damage due to a shock in shipping, or so I thought. I’ve reported the whole thing to the dealer, got a working replacement in a jiffy, was happy… almost. You see, I’m an engineer. I can’t stand just tossing things that are broken. I have to dig in and see what I can fix.
If you read the info from Mindsensors, you will learn that the compass can and should be calibrated by the customer, there’s even a piece of software to do just that. The documentation provided states, that the IMU (accelerometer and gyro) are factory calibrated and need no further calibration by the customer. However it was apparently not always so. After digging around in the old NXT files I found some NXC code that would run – you guess it – accelerometer and gyro calibration! As you see, the calibration at home was and still is necessary to get the most out of this sensor, it only seems that Mindsensors didn’t want to spend time on updating that old code to run on EV3. The problem, simply put is this: EV3 cannot execute NXC/NXE programs, the virtual bytecode machine is different.
So I took the original code in NXC and I have rewritten it completely in micropython able to run directly on the ev3dev image.
Here’s the basic code to recalibrate the sensor:
#!/usr/bin/env pybricks-micropython
from pybricks.hubs import EV3Brick
from pybricks.iodevices import I2CDevice
from pybricks.parameters import Port, Stop, Direction, Button, Color
from pybricks.tools import wait, StopWatch, DataLog
from pybricks.media.ev3dev import Font


# This program requires LEGO EV3 MicroPython v2.0 or higher.
# Click "Open user guide" on the EV3 extension tab for more information.


# Create your objects here.
ev3 = EV3Brick()
i2cIMU = I2CDevice(Port.S1,0x22>>1)
screen_font = Font(size=10)

# Write your program here.
ev3.screen.set_font(screen_font)
ev3.speaker.beep()

def ACC_CAL():
    ev3.screen.print("ACC calibration")

    ev3.screen.print("Put X axis UP! [OK]")
    while Button.CENTER not in ev3.buttons.pressed(): wait(100)
    while Button.CENTER in ev3.buttons.pressed(): wait(100)
    wait(1000)
    i2cIMU.write(0x41,'X')
    ev3.speaker.beep()

    ev3.screen.print("Put X axis DOWN! [OK]")
    while Button.CENTER not in ev3.buttons.pressed(): wait(100)
    while Button.CENTER in ev3.buttons.pressed(): wait(100)
    wait(1000)
    i2cIMU.write(0x41,'x')
    ev3.speaker.beep()

    ev3.screen.print("Put Y axis UP! [OK]")
    while Button.CENTER not in ev3.buttons.pressed(): wait(100)
    while Button.CENTER in ev3.buttons.pressed(): wait(100)
    wait(1000)
    i2cIMU.write(0x41,'Y')
    ev3.speaker.beep()

    ev3.screen.print("Put Y axis DOWN! [OK]")
    while Button.CENTER not in ev3.buttons.pressed(): wait(100)
    while Button.CENTER in ev3.buttons.pressed(): wait(100)
    wait(1000)
    i2cIMU.write(0x41,'y')
    ev3.speaker.beep()

    ev3.screen.print("Put Z axis UP! [OK]")
    while Button.CENTER not in ev3.buttons.pressed(): wait(100)
    while Button.CENTER in ev3.buttons.pressed(): wait(100)
    wait(1000)
    i2cIMU.write(0x41,'Z')
    ev3.speaker.beep()

    ev3.screen.print("Put Z axis DOWN! [OK]")
    while Button.CENTER not in ev3.buttons.pressed(): wait(100)
    while Button.CENTER in ev3.buttons.pressed(): wait(100)
    wait(1000)
    i2cIMU.write(0x41,'z')
    ev3.speaker.beep()
    wait(100)
    ev3.speaker.beep()
    ev3.screen.print("ACC calibration finished.")

def GYRO_CAL():
    ev3.screen.print("GYRO calibration")
    ev3.screen.print("Let IMU still after pressing [OK].")

    while Button.CENTER not in ev3.buttons.pressed(): wait(100)
    while Button.CENTER in ev3.buttons.pressed(): wait(100)
    ev3.screen.print("wait 2s...")
    wait(2000)
    ev3.speaker.beep()
    ev3.screen.print("Calibrating... Don't even breathe!")
    i2cIMU.write(0x41,'G')
    for i in range(30):
        wait(1000)
        ev3.screen.print(">",end="")
    i2cIMU.write(0x41,'g')
    ev3.speaker.beep()
    wait(100)
    ev3.speaker.beep()
    ev3.screen.print("Gyro calibration done!")

ev3.screen.print("AbsoluteIMU Calibration")
ev3.screen.print("Calibrate ACC? [OK]/[any]")
while not ev3.buttons.pressed(): pass
if Button.CENTER in ev3.buttons.pressed():
    while ev3.buttons.pressed(): pass
    ACC_CAL()
while ev3.buttons.pressed(): pass

ev3.screen.print("Calibrate GYRO? [OK]/[any]")
while not ev3.buttons.pressed(): pass
if Button.CENTER in ev3.buttons.pressed():
    while ev3.buttons.pressed(): pass
    GYRO_CAL()
while ev3.buttons.pressed(): pass

ev3.screen.print("Finished. Press any key.")
while not ev3.buttons.pressed(): pass
As you can see, there’s not much magic in it: Once you start it, it will ask you if you want to run the accelerometer calibration. If you press [OK] the routine starts and you have to point each of the accelerometer axes, one after another, first up (to register -1g) and then down (to register +1g), as directed by instructions on screen. If you want to skip accelerometer calibration just press any other button (except ESC as it will terminate the program)
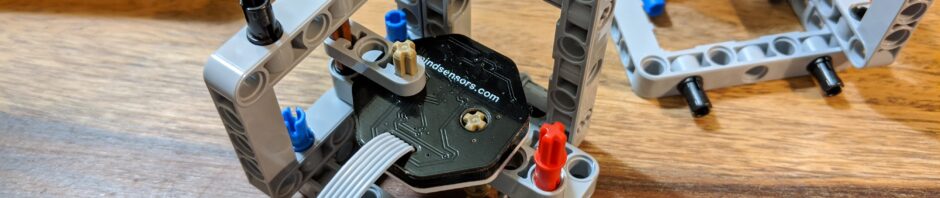
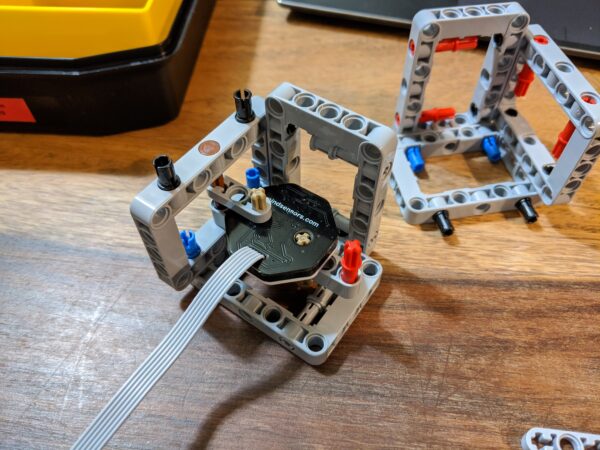
The next step is to calibrate gyro, for this you need to let the sensor sit absolutely motionless for 30s to average gyro offsets. Even the slow unfolding of a cable will register as motion, so better bolt it down to some bigger LEGO structure. Don’t clamp it to the table, MEMS sensors will react to flexing of the PCB. If you want to skip gyro calibration, again, just press any other button (except ESC as it will terminate the program) when asked.
I didn’t include the routine to calibrate compass, I will update the code if there’s interest for that.
The whole program runs using the EV3 brick booted from a µSD card flashed with EV3DEV Linux image. How to do that has been described here: https://pybricks.github.io/ev3-micropython/startinstall.html
The trick when calibrating the sensor is to get the axes straight and perpendicular to ground, as well as to make sure the IMU is ABSOULUTELY motionless in the last phase (gyro calibration). You will be best off by attaching the whole thing to a LEGO built cube and use it to turn the whole thing around. I will make an updated accelerometer calibration routine for maximum precision, but I have to iron a few bugs out still.
Don’t fret too much if you find that the unit laying flat on the table registers non-zero values on X and Y axes. The sensor chip axes aren’t that well aligned with the surface and the edges of the PCB and the built-in calibration routine isn’t that good with 3D vector math to take this into account. If this is relevant to your application you will HAVE to compensate for it in software.
So, did I fix my broken sensor?
Yes and no… The funny accelerometer readings were indeed, just a shot calibration. But the gyro has some actual issues that didn’t go away after recalibrating it. Maybe it’s within factory limits, maybe not. Mindseonsors don’t provide data on the actual chip used.
But you can now improve your sensor readings, especially compensate for some offset and drift induced after shipping. Good luck!
Edit: I resoldered the gyro chip. Now it works right. Seems it was a power issue in the first place. Just to be sure I have reflowed all solder joints – I had to recalibrate the unit after that. Now all axes register just right. It seems that my first unit was a reject from QC pulled before calibration due to a bad gyro, that somehow did slip through to shipping.
What did you do to open the AbsoluteIMU-ACG? I’m having the exact same issue with Gyro reading. They just dont make sense.
The IMU is stuck together with double sided tape, so a careful application of a sharp blade does wonders.
You don’t need to open the IMU to calibrate the unit though, just the code I’ve posted.